Mock service in SOAPUI
What is mock services?
“Mocking
service, is the practice of creating a facsimile environment that works similar
to the environment you’re facsimileing”.
Web
Service Mocking is a very useful tool in your testing arsenal. It's
the solution to the question "How do I create tests for a Web
Service when there is no Web Service to write test against?” Web
Service Mocking will come in handy here. It allows you to create a
simulation or approximation of the Web Service before the actual Web
Service goes live.
Below are the steps for “Mock services”:
- Create a new project
- Generate mock services
- Enter Dummy data in the Mock response
- Run MockServices
- Generate suite for the project
- Run the project
1.
Creating a new Project:
Step 1: Create a new project. Follow the path: File
>>New SOAP Project or just click any where in soupUI tool and
use ‘Ctrl+N’ to create a new project.

After clicking New SOAP
project it will show the pop-up which looks like as shown in below

Step 2: Now,
we have to enter the project name and point it to a valid WSDL/WADL.
In this tutorial, I am calling the project as “global weather”
and pointing it to the sample WSDL file.Here,I have given the sample
WSDL URL below.You can run to get started with soapUI.

Based on the given WSDL
which you have entered above, soapUI will load the related definitions and
configuration and will show up the operations in the Web Service as
shown in below.

Step 3: Generate
the SOAP Mock Service: Follow
the path: Right click on the project >> Generate SOAP Mock
Service.

In Generate Mock Service dialog
box, options are available to change the port number and host name. Then click
on “OK” button

After clicking on “OK”
button, we will get a pop-up to enter Specify name of Mock Service to create as
shown in below.
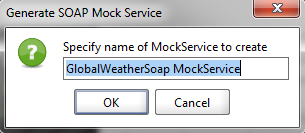
Click on “OK” button to
add the suite for mock services
Step 4: By Default response will create under the Mock Service suite. The screen is shown in below

Step 5: Now Double click on the “Response 1” to get
the response. New window should get displayed. Now you can enter any text in the response 1 like as shown
in below.

2) Invoking a MockService:
First we must start the MockService. Click "Run" icon in the MockService editor.
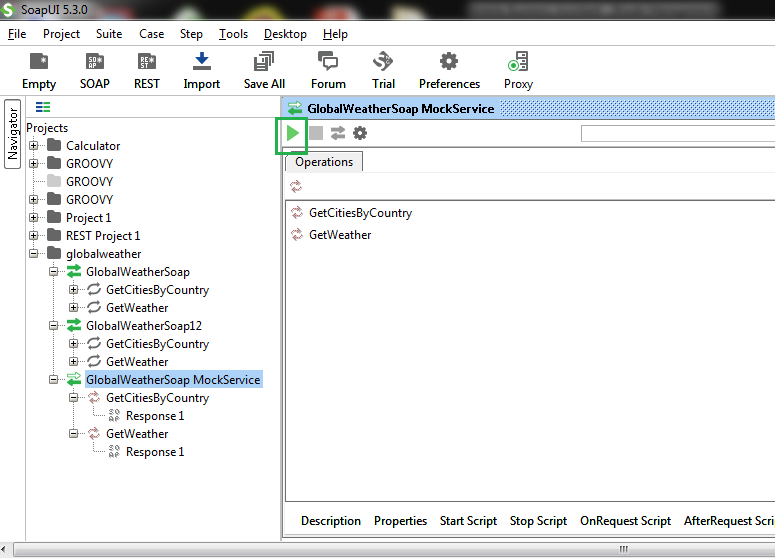
To the Top Right of the
Editor you should see that it's running, and the port it's responding on. The
play Button is grayed out and if you would like to stop the MockService, just
click"Stop" icon.

3)
Step 1:
After run the mockservice we need to create the test suite. Select the Project and right click on that project and select “Generate TestSuite”.
After run the mockservice we need to create the test suite. Select the Project and right click on that project and select “Generate TestSuite”.


Step 2:
Enter the name of the test suite or By Default it gives the name and press OK.
Enter the name of the test suite or By Default it gives the name and press OK.

The created test suite is displayed in the navigator pane as shown below. And the test Suite window opens in the Right side.

4) Mocking:
Step 1:
Now select Mockservice and double click on that. New window should get displayed. Click on the “Soap” icon of the Response 1, this will prompt you to open one of the existing requests for its operation in your project. Select the “Request 1” and click on “OK” button
Now select Mockservice and double click on that. New window should get displayed. Click on the “Soap” icon of the Response 1, this will prompt you to open one of the existing requests for its operation in your project. Select the “Request 1” and click on “OK” button

Step 2:
Now click on “Run” Button. We will get the output like this as shown in below.
Now click on “Run” Button. We will get the output like this as shown in below.

As you can see the MockService returned the values we entered earlier as
the response.

Note: First
to modify the created MockResponse content and re-submit the request
to see that your changes are instantly available, there is no need to
restart the MockService.
Thanks & Regards,
Siddhardha Ravuri,
Test Associate,
MOURI Tech PVT LTD.
http://www.mouritech.com/
Comments
Post a Comment